Tasks
A task is anything that has to be dealt with on the construction site: a snag, a defect, a point to check, a question or a piece of information. It is the central item of Touch2build: drawings, members, reports and planning all exist to create, follow and close tasks.
Each task has a status:
| Status | Meaning |
|---|---|
| Open | To be dealt with. |
| Resolved | The assignee says it is done. The task waits for a check. |
| Closed | Checked and closed. |
This three-step cycle makes sure that work is only closed after it has been checked: the assignee resolves, the person in charge checks and closes.
Where are tasks created?
Most of the time, tasks are recorded on site with the mobile app. They appear in the web app as soon as they sync. You can also create tasks from the office, as described below.
Create a task on a drawing
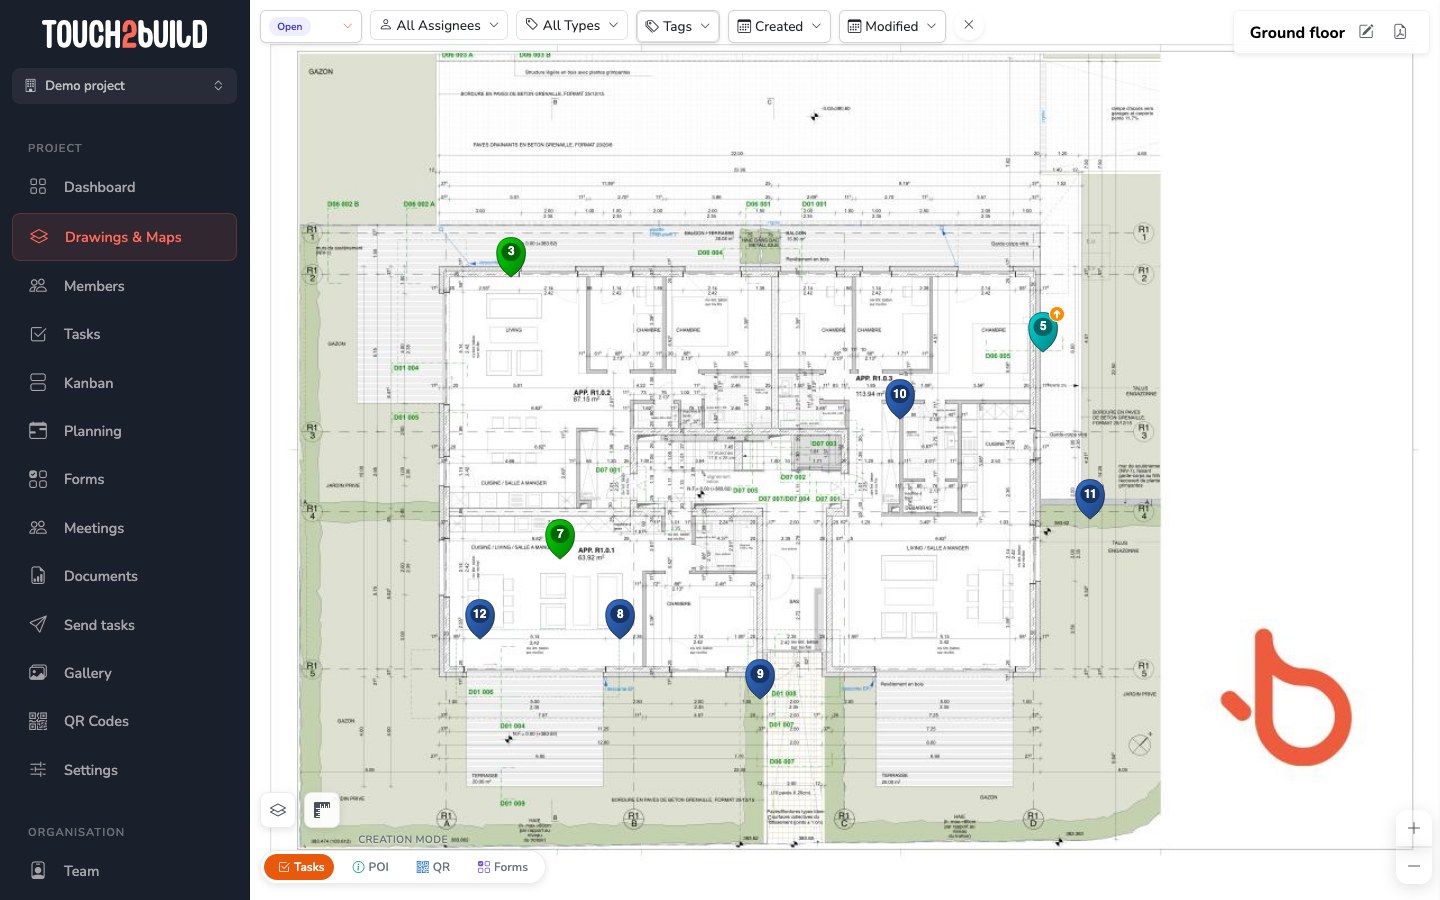
- Open the drawing or map from Drawings & Maps.
- Check that the Creation mode, at the bottom left, is set to Tasks.
-
Long-click (about half a second) at the exact spot of the problem: keep the mouse button pressed without moving.
-
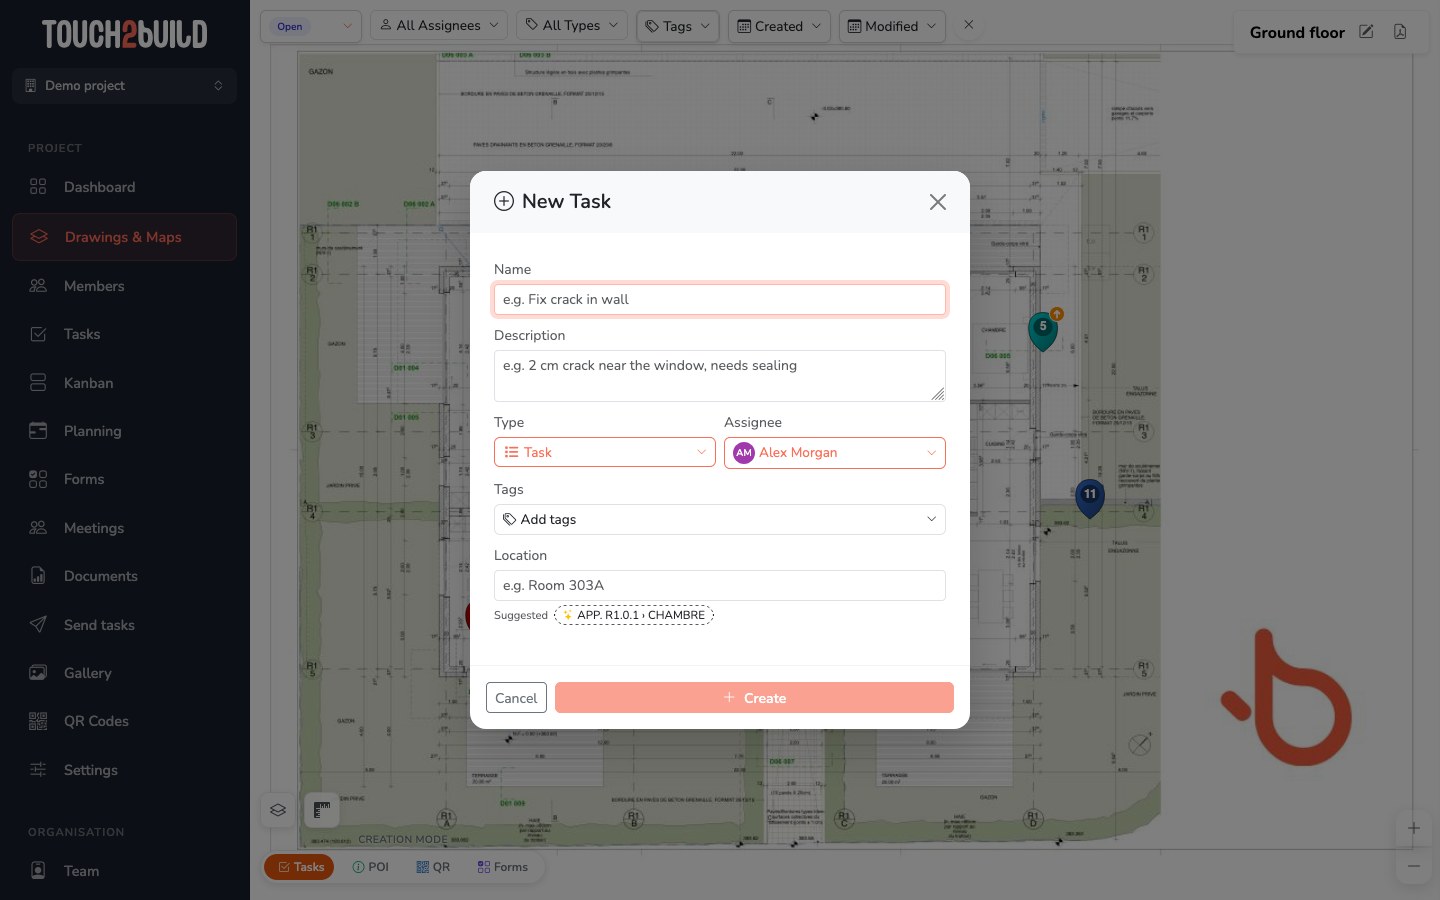
The New Task window opens.
-
Fill in the fields:
- Name
- A short, clear title, for example Missing socket. This is the only required field.
- Description
- The details the assignee needs.
- Type
- The nature of the task: task, check, information…
- Assignee
- The member or company who has to deal with the task.
- Tags
- The trade and the nature of the problem, for example Electrical and Missing. Up to 10 tags per task.
- Location
- A detail about the place: apartment, room, plant room…
-
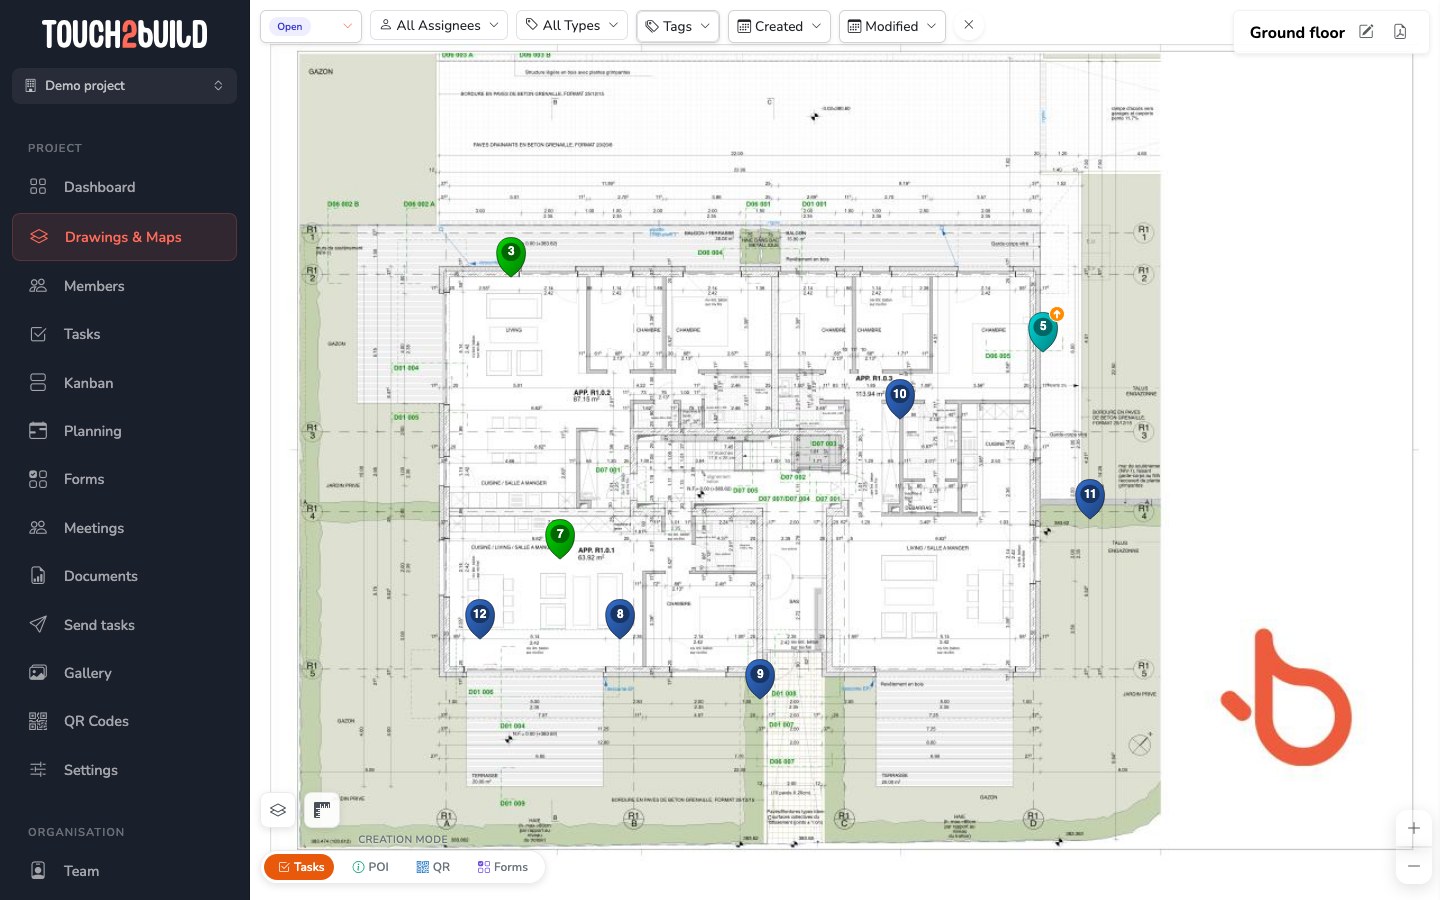
Click Create. The pin appears at the chosen spot.
Automatic suggestions
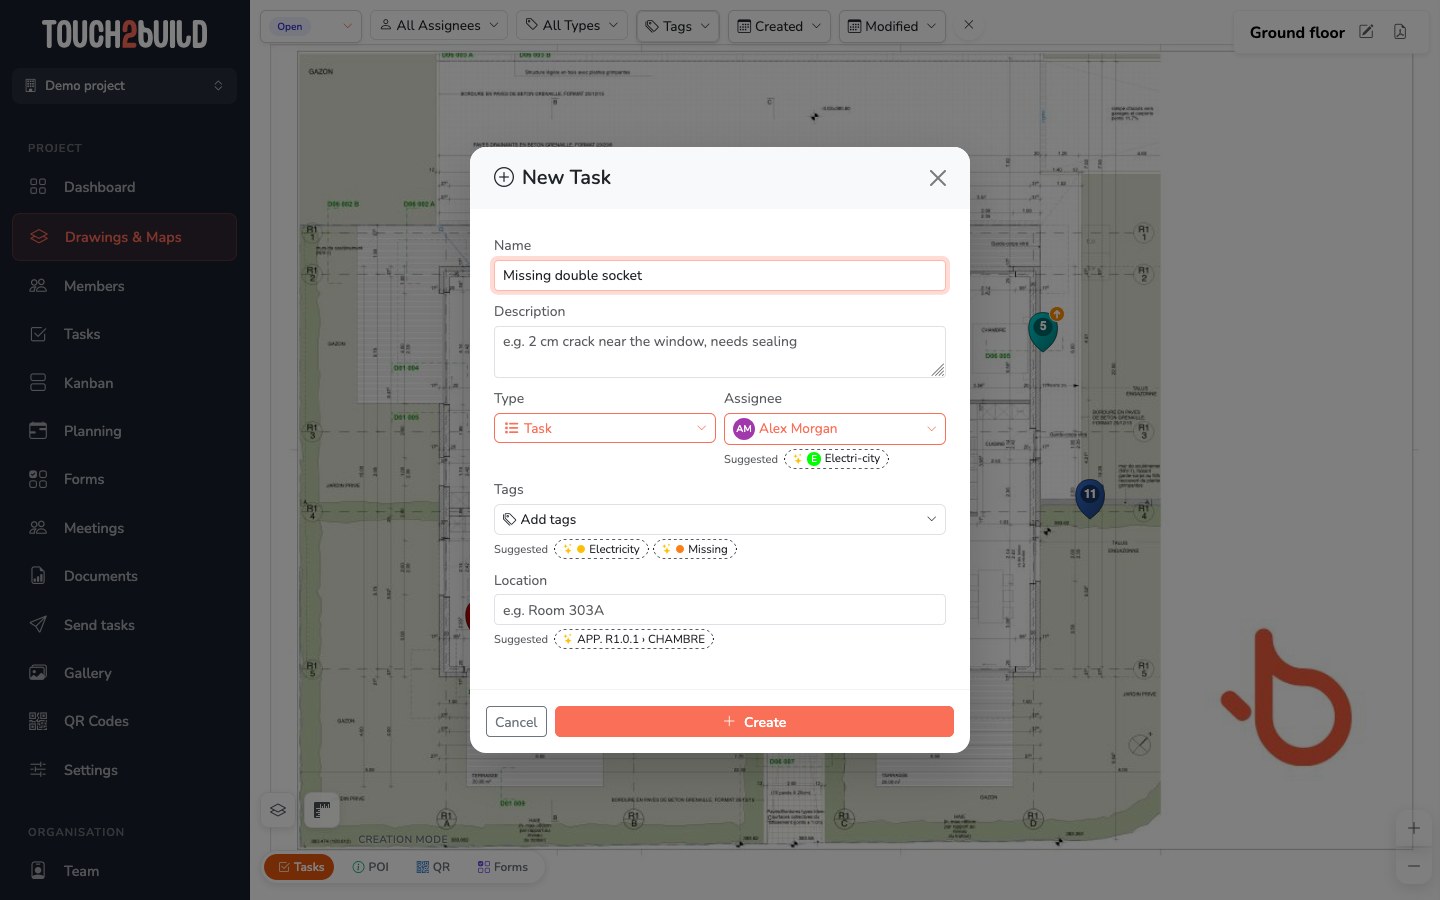
As soon as you have typed the name, Touch2build suggests the most likely assignee and tags, based on the tasks already created in the project. They appear under Suggested: click a suggestion to apply it.
Move or copy a task on the drawing
- Move: drag the pin to its new location.
- Copy: hold the Shift key and drag the pin. A copy of the task is created at the new location. This is handy when the same defect repeats in several apartments.
Create a task without a drawing
From the Tasks page or the Kanban, click New Task. The task is then placed on no drawing or map: it is a generic task, across the whole project. It suits anything that does not belong to a precise place, for example Provide the joinery data sheets or General site clean-up. You can place it later from its details.
Tasks without a drawing are included in the Pro plan and during the project owner's trial. See Compare the offers.
Task details
Click a pin on the drawing, a row in the list or a card in the Kanban: the details open in a panel on the right. It brings together everything needed to deal with the task and keeps a record of every exchange.
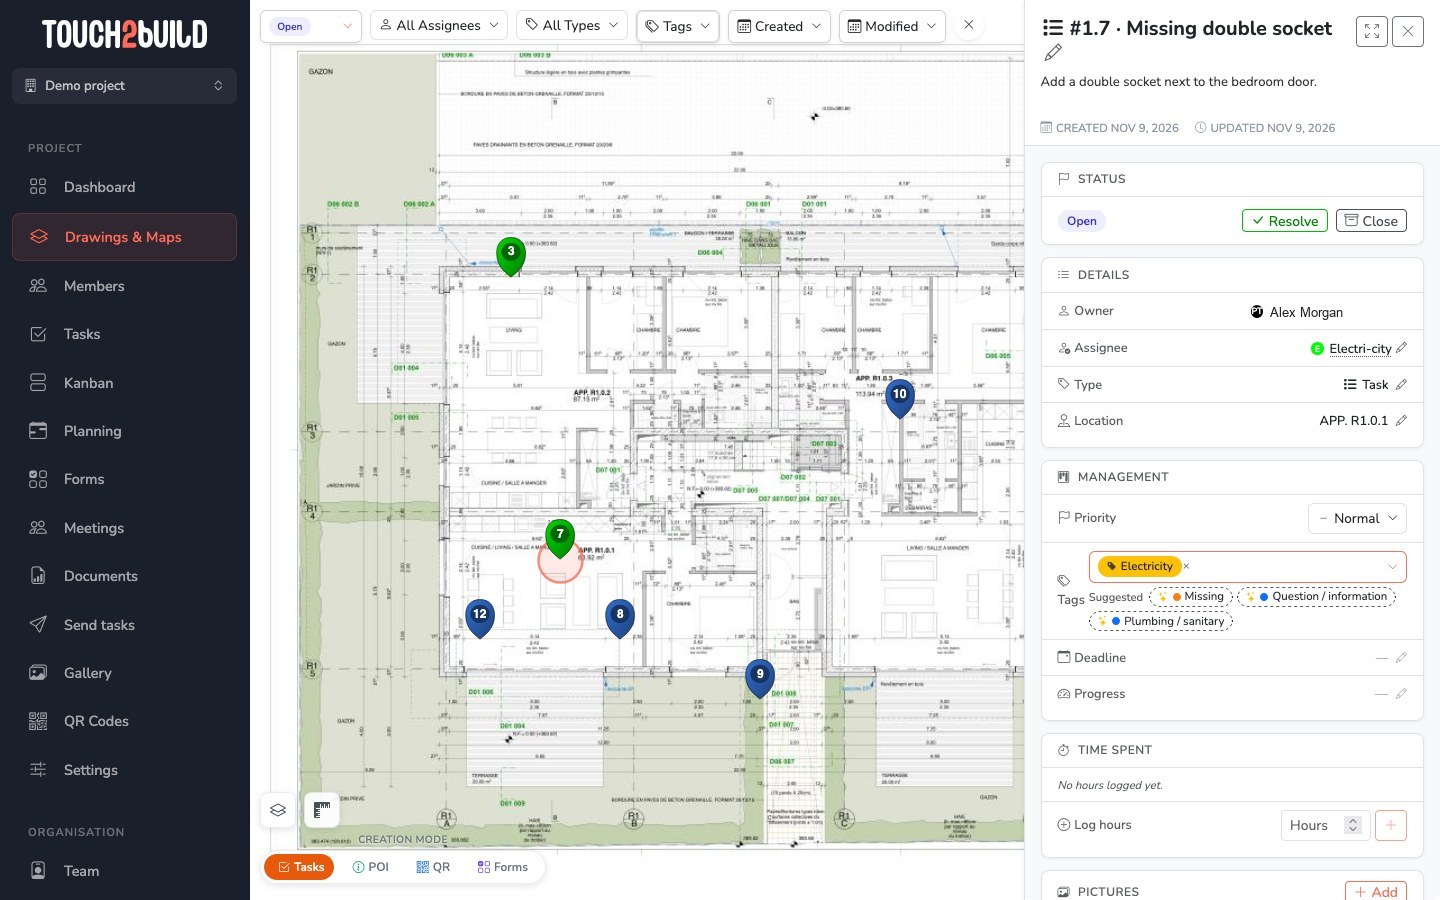
- At the top
- The task number and title; click the pencil to edit the title. The button opens the task full page.
- Status
- The Resolve, Close and Reopen buttons change the status.
- Details
- Owner (the creator), Assignee, Type and Location. Click the pencil of a field to edit it.
- Management
- Priority (Low, Normal, High, Critical), Tags, Deadline and Progress.
Further down the panel:
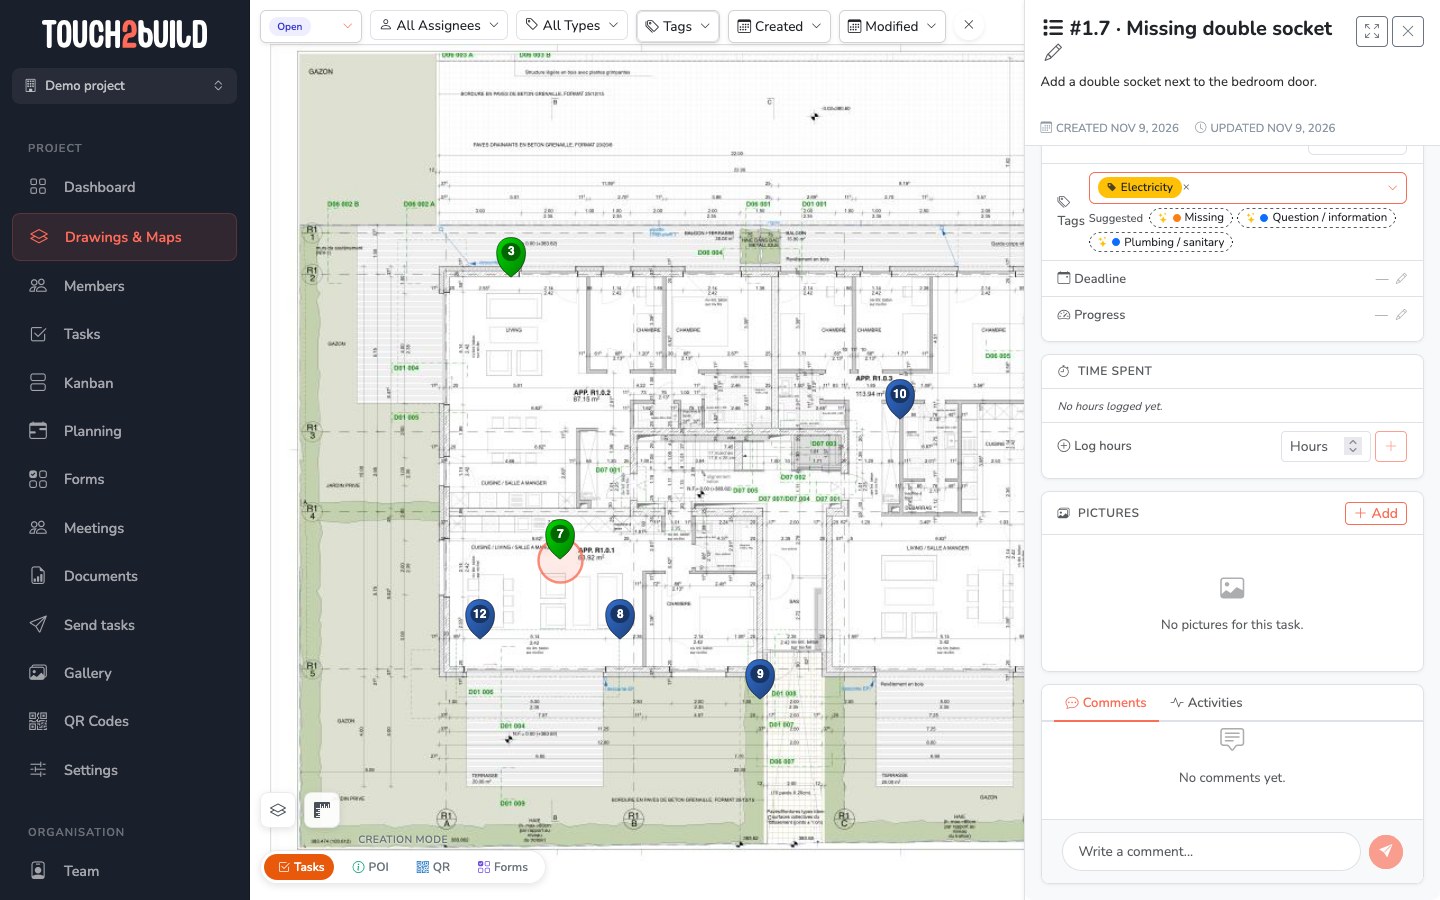
- Pictures
- The task photos, most often taken from the mobile app. The Add button lets you add some from your computer. Click a photo to enlarge it, then annotate it if needed.
- Comments
- The conversation with the assignees. Write in Write a comment... then click the send arrow.
- Activities
- The full history of the task: who changed what, and when.
Editable tasks
Only open tasks can be edited. To correct a resolved or closed task, reopen it first.
Annotate a photo
A rectangle around a crack or an arrow pointing to a badly fitted socket shows the problem better than a long description. On the web, you place shapes with the mouse rather than drawing freehand.
- In the task details, click the photo to open it full size.
- Click Annotate, at the top right. A toolbar appears under the photo.
- Choose a shape: Rectangle, Circle, Arrow or Line.
- Drag the mouse over the photo to draw the shape. A simple click places a medium-sized shape; the arrow then points to the spot you clicked.
- Click Done.
After you draw a shape, the Select tool takes over and the shape stays selected:
- drag it to move it;
- pull its white handles to resize it or, for an arrow or a line, to move one end;
- click a stroke colour or thickness to change it;
- click or press Del to delete it.
The colour and thickness you choose are also used for the next shapes.
Annotations are saved when you click Done, but also when you close the photo or leave the page. Cancel drops the changes made since you opened the toolbar. Esc first deselects the current shape or tool; pressed again, it leaves the annotation and saves.
The same annotations everywhere
The shapes become annotations just like those drawn on site: they appear in the mobile app, in the gallery and in the reports. Once saved, a shape can no longer be resized: to correct it, delete it and draw a new one. Annotations made on mobile are deleted the same way.
Who can annotate?
The Annotate button appears for the members who can edit the task.
Log time spent
Each assignee can note the hours spent on a task: a repair, a snag clearance, a visit. You then know what each task cost in time, and who worked on it.
A project option
Time logging is off in a new project. The administrator turns it on in the project settings, under Time spent. As long as it is off, none of what follows appears.
Log hours
In the task details, the Time spent block lists the hours already logged: who, how many and on which day. The total is shown in the header of the block.
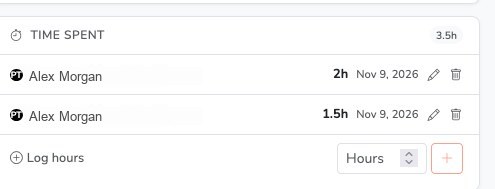
- On the Log hours line, enter the number of hours, for example 1.5 for an hour and a half.
- Click or press Enter.
Each entry is saved in your name and with today's date. You can log hours on an open, resolved or closed task: the time spent checking a cleared snag counts too.
Hours can also be logged on site, from the mobile app.
Correct or delete an entry
To the right of each entry, the pencil lets you correct the number of hours, and the bin deletes the entry.
Everyone corrects their own entries. Members who have the Edit all permission on tasks can correct everyone's: see permissions.
Additions, corrections and deletions appear in the task Activities.
Follow the time spent
Once logging is on, the time spent appears everywhere you follow tasks:
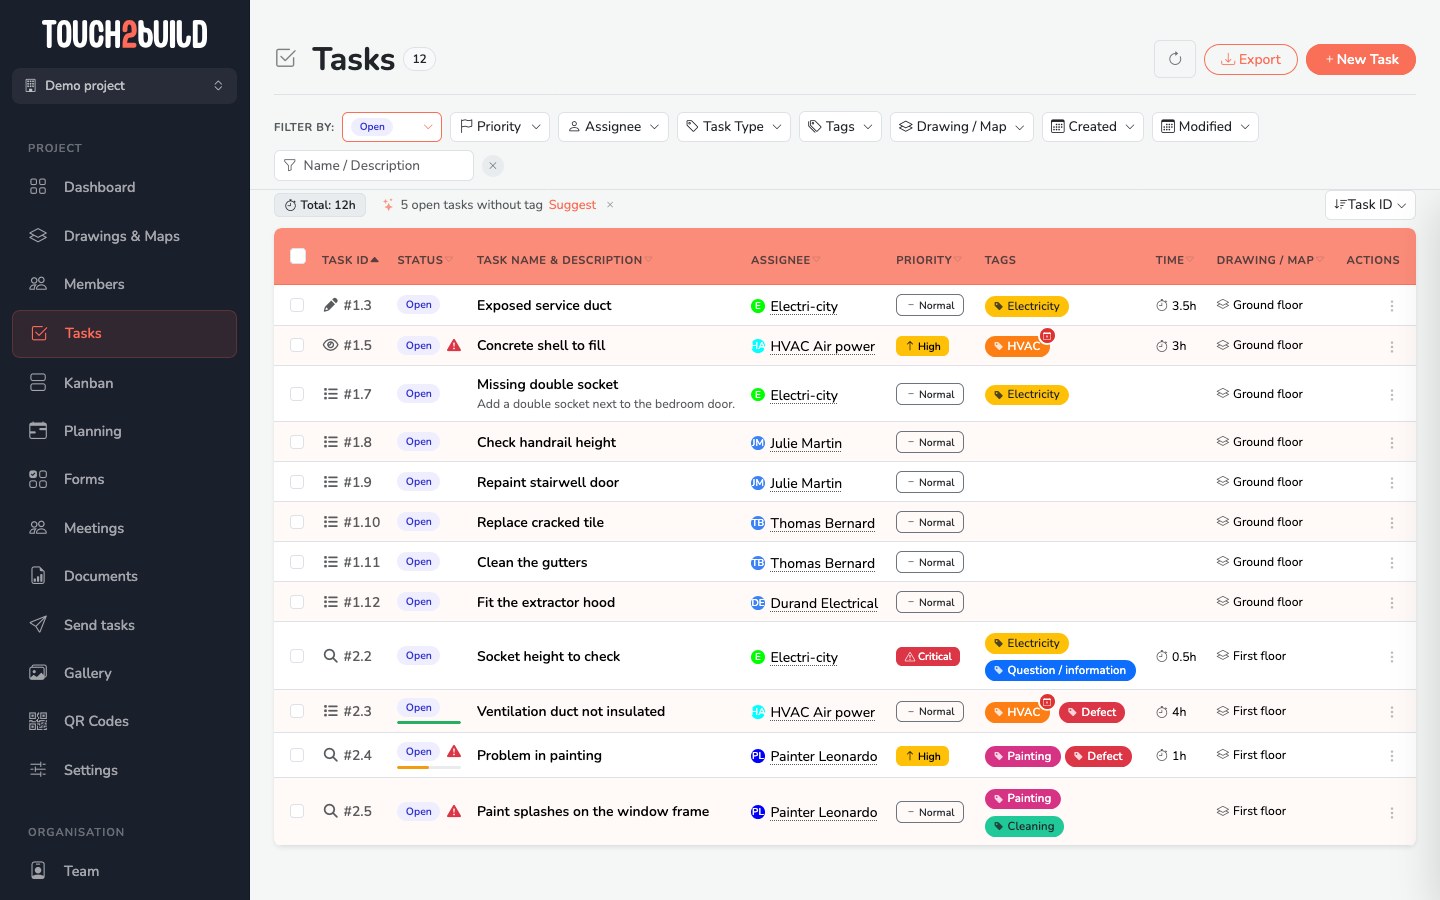
- Task list: a Time column gives the total of each task; click its header to sort. Above the table, Total adds up the hours of the filtered tasks, for example those of one company. When you tick tasks, the action bar also shows their total.
- Kanban: each card shows its time, and each column and the whole board show their total.
- Dashboard: the Time Spent by User chart and the Logged Hours per Week chart. A member who only sees their own tasks sees My Logged Hours per Week.
- Reports: the Excel export adds a column with the time spent; in the Word exports, tick Time spent in the task information.
Review the work with a company
In Tasks, filter on the Assignee you want, with all statuses: the Total above the table gives all the hours logged on their tasks.
The task list
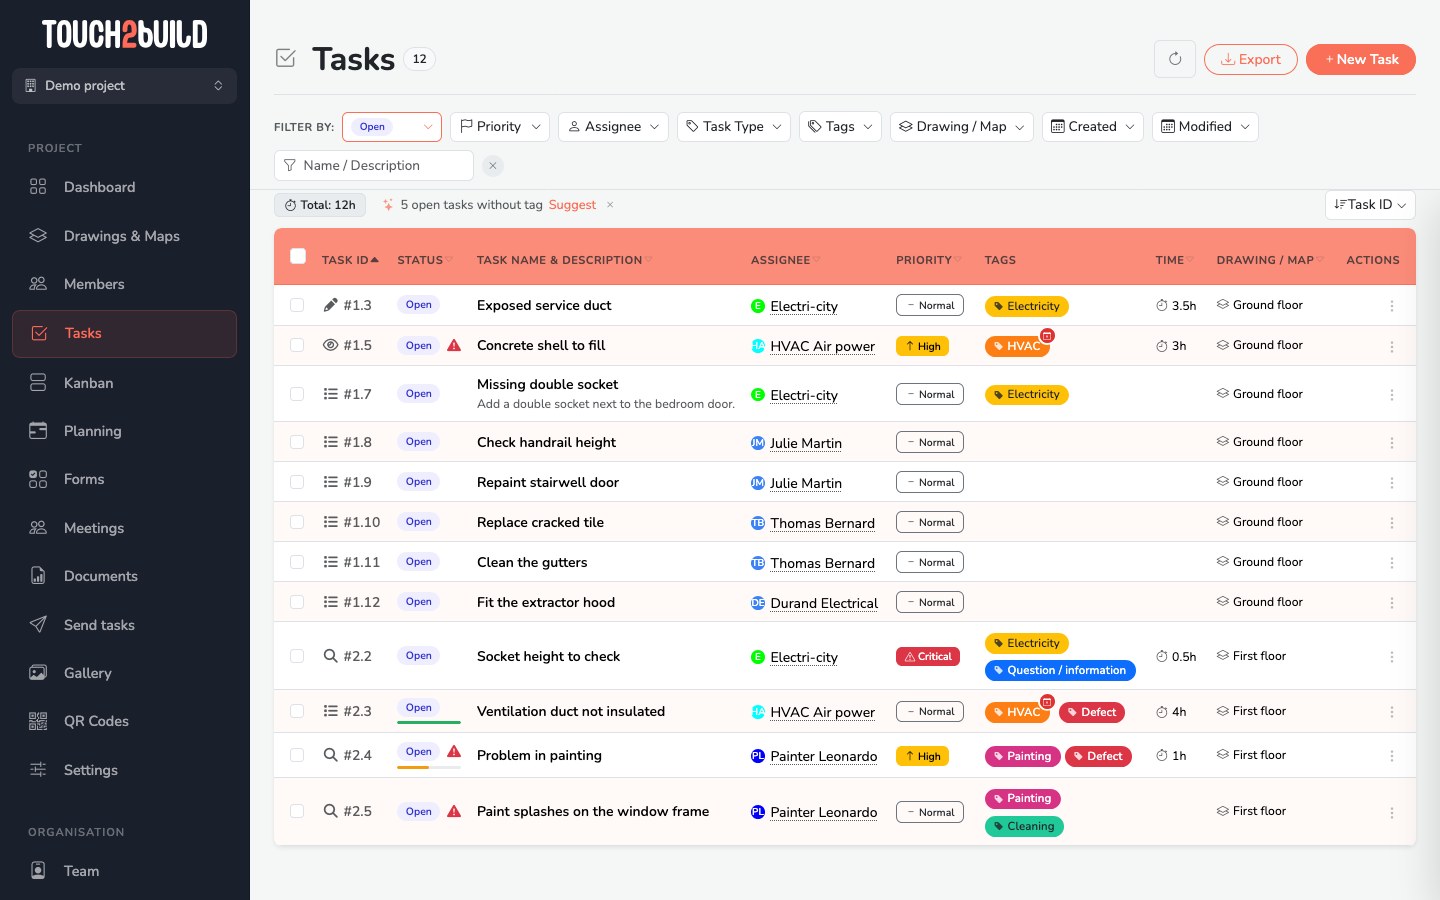
The Tasks section shows all the tasks of the project as a table. It is the working view of the office: find a task, review the work with a company, process tasks in bulk or prepare a report.
Tags out of planning
A small red badge with a calendar on a tag shows that this trade is out of its period in the planning: none of its periods of work includes today's date. The task still has to be dealt with: the company will have to come back. On hover, the tag shows "out of planning".
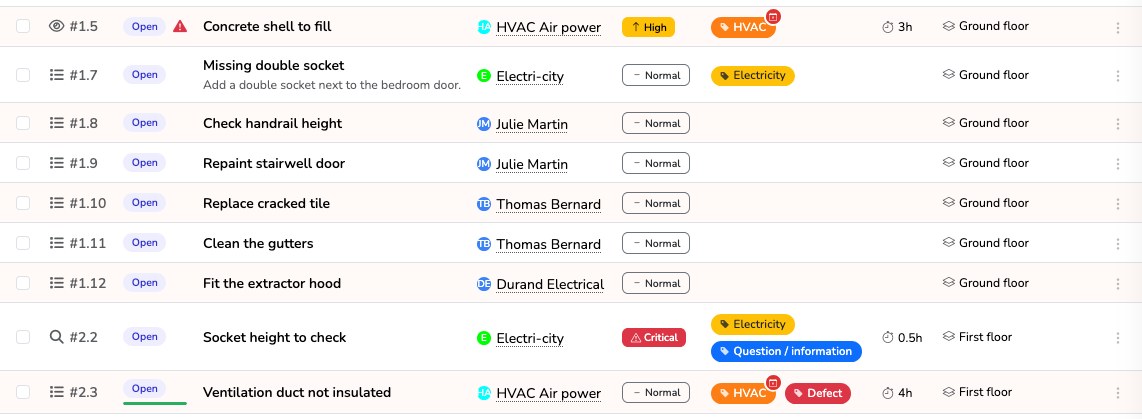
The badge only appears:
- on tags that have at least one period in the planning;
- on tasks that are still to be dealt with: open tasks, or resolved ones too if the planning counts the Not closed tasks;
- for members who have access to the planning.
In the list, it is the counterpart of the red bubbles of the planning.
Filter
The Filter by: bar combines several criteria:
- Status: by default, only open tasks are shown;
- Priority, Assignee and Task Type;
- Tags: tick Must have all selected tags to show only the tasks that have all the chosen tags;
- Drawing / Map;
- Created and Modified: in the last N days, more than N days ago, or between two dates;
- Name / Description: search in the text.
The cross clears all the filters.
A red triangle next to the status shows a late task: its due date has passed.
Sort
Click a column header, or use the sort menu on the right above the table.
Act on several tasks
Tick the boxes to the left of the tasks. An action bar appears: Resolve, Close, Reopen or Assign all the selected tasks at once.
Export
The Export button produces a report from the displayed tasks, taking the filters into account. See Reports and exports.